
Making Your Own Canoe Route Maps
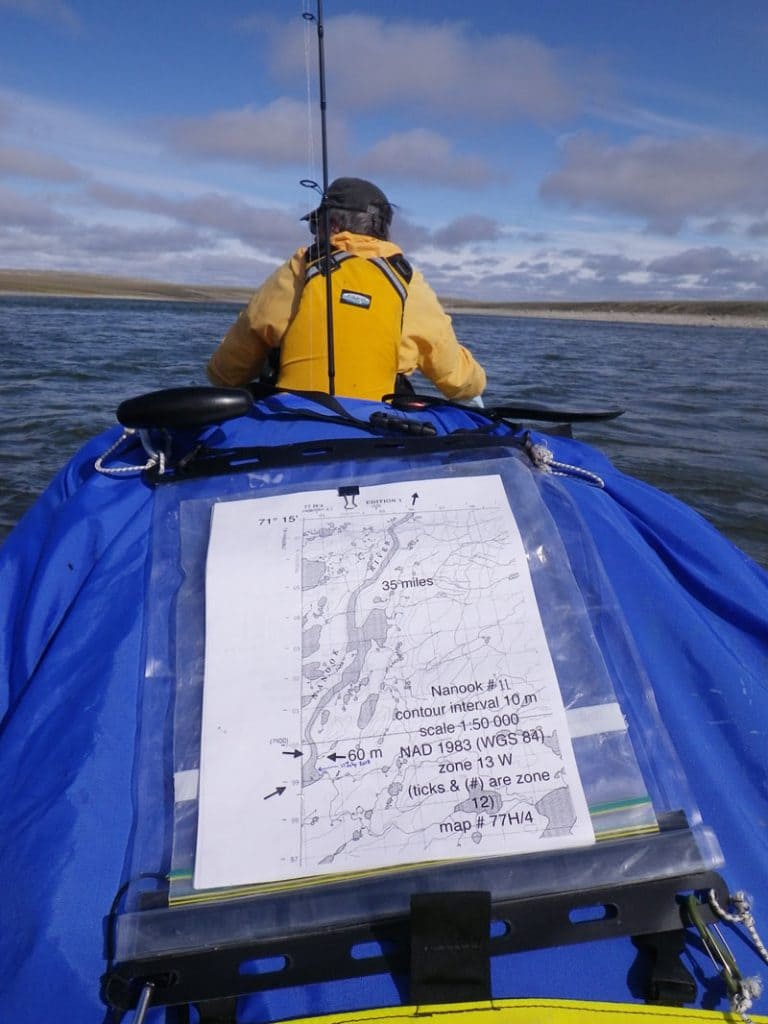
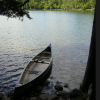
Custom made annotated map example of the Nanook River, Jim and fishing pole in the background. Photo by Brian Johnston.
Making Your Own Maps Innovation and Traditional: Navigating, Mapping, and Online Route Planning Tools
Making your own maps is a great way to be more involved in route planning and it improves your understanding of maps. You can spend time during the cold weather months with online resources preparing for your next wilderness adventure. In the end, you will have custom route maps.
This article will outline some suggestions and steppingstones to help you get on your way at creating your own custom trip maps (from creating digital images to printing).
Before describing the how to make custom maps, this article will reflect on traditional and innovations for navigating and mapping as well as online route planning tools.
People are increasingly taking more electronic equipment into the backcountry. Portable solar and battery charging devices are readily available. There is an electronic tipping point where a digital map (device) will supersede paper maps on trips although we are not yet there. Whereas, some will argue that hard copy maps will never be obsolete for true wilderness travel. For some, maps that one can hold are the essence of going into the unknown or following in explorers’ footsteps.
As we continue to use and rely on more electronic technology, we continue to question, consider, and search for where and how to use and place the new technology so that it is most productive. For the iPhone, iPad, or similar handheld device, the key for all mapping apps is saving or caching (store local for future use) a map to use outside of cell coverage, Wi-Fi, or Internet connectivity. However, there are other issues such as screen size, screen visibility in bright sunlight, battery life, as well as weather and water protection. There exists viable solutions for caching maps, battery life, and physical device protection but screen size and visibility still limit handheld device functionality in the field. Even the larger touch-screen GPS devices do not show enough area—a paper map is still better for situational awareness and on-the-water navigation. In my opinion relying on electronics as your primary navigation means is not yet acceptable.
Where are we on the continuum?

The Navigating Continuum—Paper to Electronic
There are a limited number of basic navigation options available to the backcountry travellers ranging from traditional to electronic. Consider these four route-finding alternatives:
- Time-Honoured Traditional or Old School Traditional—Use paper maps and a compass
- Traditional or Established—Use paper maps, a compass, and a simple GPS (this method is well established for long backcountry trips such as those trips that are greater than a week, for example Far North canoe trips)
- Hybrid—Use custom paper route maps with a compass and a simple or mapping GPS
- Electronic—Use a mapping GPS (take paper maps and a compass as backup)
As previously mentioned, we are not yet at the tipping point of going full on electronic. A hybrid option is within reach and offers benefits over traditional maps. Therefore, I advocate using technology to create custom maps, which you print and take on your canoe trip (primary navigation—custom paper maps) as well as the digital versions (backup—electronic maps).
With some Smartphones and handheld devices you are able to cache or store local version of maps for offline use. Similar, some GPS units allow maps to be stored in the device. Additionally, GSP devices from Garmin, Delorme, Lorance, or Magellan have map packages for sale.
The hybrid option also includes using a GPS
As outdoor enthusiasts move from paper to electronic, there is also the necessity of learning and knowing how to use and understand all the functions of electronic devices such as a GPS including the time-honoured skill of reading maps. I have seen firsthand where the lack of skill in map reading and GPS use has rendered people in need of assistance. This is why some seasoned trippers regard GPS devices as trail toys. If you are going to embrace technology, for example, a GPS on trips then you also have to know how to use it—to navigate or to collect data points for post trip purposes.
Although we are not yet at the full-on electronic end of the continuum you may still wish to take a GPS and use it for:
- zooming in, such as locating a obscure portage (requires a mapping GPS)
- creating waypoints to record the position of something, for example an eagle nest, cairn, campsite, portage, and so on
- determining your position, for instance on a long and straight river section without visual fixing features (no rapids and low contours)
- on-trail trivia, namely your speed, distance to a waypoint, elevation, and so on
- GPS your photograph locations (without having a GPS enabled camera)

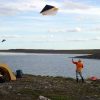
Established Far North navigation method; a topographic map with simple GPS, Jim, handmade muskox wool hat, Wellington Bay, Canadian Arctic.
Trip Preparations
Along with using the hybrid model for navigating, I advocate using technology to prepare for the trip. The world is cyclic. Thus, start with technology to research and plan your trip including making your own maps and sharing files with other participants. Next go on your trip and execute your plan. Use custom paper maps, GPS, camera, and digital journal. Once home, return to technology to record and share your trip information and route, as well as stories and photographs.
Online Route Planning Tools and Map Resources
I foresee in the future we will be at the full-on electronic end of the continuum but for now, the goal is to explore how to make and print custom maps.
Gone are the days when my paddling partner and I would trek into the city and rendezvous in the map library at the university. Sure, I still enjoy visiting the map library from time to time. There you can pull out large map sheets and have them come to rest on a vast tabletop. Then you can pursue various trip options—dream and scheme of unbounded wondrous adventures.
However, the reality of travel, parking, and time constrained visits as well as the limits of photocopiers and the inevitable I-forgot-to-photocopy-that-section-of-map all mounts a front against the romance of the map library. The map library is becoming outdated—the digital world is where route planning occurs, and for good reason, including the ability to save, share (email), edit, revise, as well as view, overlay, and compare different kinds of maps. With the click of a mouse you can search maps and create elevation profiles, measure distances, and change scales. A major online advantage is that maps are seamless and continuous as the world is.
Gmap4 >
Treksee >
GoTrekkers >
Toporama >
CalTopo >
Google Earth >
Map sites provide seamless or continuous maps, i.e. no more finding the adjacent map sheet. Many mapping sites allow you to toggle from various topographic maps to satellite imagery and more. Some sites feature measuring tools and other useful planning tools. Most mapping sites have a zoom feature. There are sites that are searchable by place, lake, and river names.
Usually printing from a mapping site yields poor results but the odd site offers a print function. The digital equivalent of printing, to snip, grab, capture, screen shot, or print screen, is available at some mapping sites. In most cases, mapping sites permit some sort of saving or linking so your route planning information may be saved for future reference or shared with other trip members. This collaborative nature of online mapping is most beneficial for route planning.
The end goal of this article is to look at how to make your own custom maps. In doing so, I will outline several concepts or methods of obtaining or creating paper maps. It depends on how much effort you wish to put forth.
If you are not yet ready to make custom maps, you can still buy traditional paper maps. You may purchase maps from a physical store hear home, an outfitter near your destination, or online.
A similar but improved option is to purchase paper maps where you decide on the map sheet boundaries. An online option, for instance Mytopo.com offers such a service—you pick the boundaries. Another advantage of Mytopo.com is that you can change the scale to suit the needs of your trip. For example, a mixture of scales is possible. In 2012, I used two map scales for my 1000 kilometre canoe trip. I bought printed but custom map sheets of traditional 1:50 000 topographic maps for river sections and custom but larger scale map sheets for the larger lake sections (1:75 000 topographic maps). Mytopo.com is a quick and easy way to get all your maps. You may also customize the maps with your own digital information and have them printed (options include waterproof, glossy, laminated, and even supersize and banner).
Mytopo.com >
Purchasing maps sometimes has the advantage of optional printing on waterproof paper or Tyvek like material, which improves their durability during the trip. Another option is to produce simple maps from many of the aforementioned mapping sites and print them.
Annotate Maps
The time to annotate maps is when you are trip planning and making maps. In general, I prefer to add standard map information whereas some people like to gather and record more extensive route and camp information. Either way, to each map page, add general map information (easting and northing numbering, contour interval, scale, datum, zone, and National Topographic System (NTS) sheet number). You may wish to add your own map page numbers (#1, #2, and so on), route directional arrows, and distance to go markers, as well as elevation drop where contours cross the river. Additional information if known may also be added, for example campsites, portages, historical points of interest, and so on. Trip logs and reports from online forums and communities such as Canadian Canoe Routes (myccr.com)is a resource for finding additional route information, as are exploration journals. Far North travelers often annotate hamlet maps with the locations of the airport, post office, RCMP, wildlife and fisheries office, bulk fuel (camp stove fuel), museum, and so on.
Making Custom Maps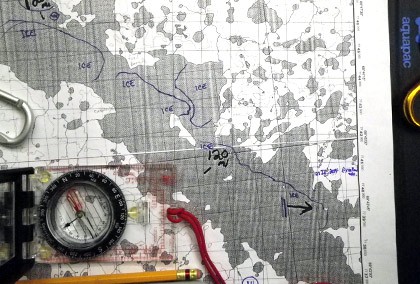
I will briefly outline two concepts or methods of making your own custom maps. Both rely on free digital topographic maps and result in custom paper maps. One method replies on working with PDF files. The other method uses GIS, which requires more knowledge or a steeper learning curve. In both cases, free software is available. If you wish to pursue either method, you will have to invest time and effort to figure out the step-by-step details of the software used.
There are other viable methods if you use or have software such as Photoshop, Garmin BaseCamp, etc. In all cases, you have to create a map and then print it.
Custom PDF Maps—simple but less powerful than custom GIS maps
Get Free Maps, download, and uncompress (unzip) map files from http://ftp2.cits.rncan.gc.ca/pub/.
If you wish to take paper maps on trail, then consider how you are going to print your maps. Match the digital image size to your printer output. To do that, use a software program to cut the full-size map image into printable pieces (such as PosteRazor). The result is a multi-page PDF file. Save and keep this original file for reference. Review the multi-page file and delete unneeded pages. Save the file with a new name so that you do not overwrite your original file.
Now you are ready to annotate the map pages. Most PDF programs have an annotate feature. Learn how to use it to add text and shapes as required.
Combine the custom maps pages into a single PDF file. Print and share with other trip members.
There are other ways to achieve similar results. Take screen shots of digital maps and paste the images into word processor or presentation software. Crop, stitch together, annotate, organize, and save as a PDF. If using 1:50 000 topographic maps, 11 by 14 UTM squares fill an 8.5 by 11 page. Similarly, 11 by 22 UTM sections fit on to an 11 by 17 page. A free screen capture utility such as irfan allows a default shape size-cutting tool. A setting of 2400 by 3000 pixels fits a letter-sized page. Once printed, check that the UTM lines are 2 cm apart (or 4 cm if using 1:250 000 topographic maps).
Custom GIS Maps—more involved but more powerful than custom PDF maps
Use Google Earth to make a general “path” of your planned route. Download the path (“Save Place As” a .kmz or .kml file or email it to yourself).
Open the saved .kmz file in a GIS application (i.e. ArcGIS or QGIS (free)). Add data layers such as the Canadian Map index. Add the needed geotiff map sheets (free) via the http://www.nrcan.gc.ca/earth-sciences/geography/topographic-information/data/11042 website.
Make daily trip maps of your choice of distance.
Print the custom maps.
I have outlined two methods of making custom maps. In both cases, print and use paper maps as your primary maps. The printed maps will need protection while in use (waterproof map case, water seal, or laminate with grommets). The digital version of your maps may supplement your print maps. I also take digital 1:250000 topographic maps for reference. It is also possible to add a “track” of your trip to your GPS.
I am not yet ready to rely on digital maps and an electronic device while on trail. I do use digital maps and Google Earth images while on a canoe trip to supplement my paper maps. Similar for my compass, it is still a Silva Ranger in my map case. I primarily use a compass as a directional tool and have not yet migrated to using an electronic compass.
On the navigating continuum, I advocate a hybrid approach of using custom paper maps with a GPS and compass. I do my entire pre-trip route planning utilizing online mapping resources and tools.
Now is the time to make and take your own maps. The future holds a different story.

Jim and Brian heed map information when they encountered endless ice, mytopo map sheet example.
Canoeing.com articles are intended for inspiration only. We do our best to include accurate and helpful information, but they are not intended to be complete trip planning guides. Wilderness travel and canoeing are inherently risky activities and environmental conditions are always changing. It is important to exercise judgment and due diligence by selecting routes appropriate for your skill level, and gather additional information. Do not rely solely on the information found here, all risk and liabilities are yours alone.